Back in jPipe 101 you wrote the release argument: the conclusion “Version
2.0 is ready to ship”, argued by the strategy “All release gates pass”, resting on two facts,
“The test suite passes” and “The changelog is up to date”.
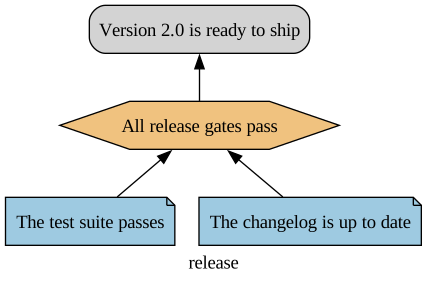
As drawn, the argument only asserts those facts. To actually validate it, you would check them
by hand: to trust “The test suite passes”, you would run the tests and see them green; to trust
“The changelog is up to date”, you would open CHANGELOG.md and confirm it mentions this release.
If both facts hold, the strategy “all gates pass” holds with them, and the conclusion follows: the
version is ready to ship. If either fact fails, the argument falls with it.
This tutorial automates that exact reasoning. You will attach to each claim a small piece of Python that runs the real check, then let the jPipe Runner walk the argument for you, bottom-up, and colour every node by what actually held.
The idea will feel familiar if you have used a behaviour- or keyword-driven test framework. In
Cucumber, each plain-language Given/When/Then step is glued to a
step-definition function; in Robot Framework, each human-readable
keyword maps to a Python implementation. jPipe applies the same idea to an assurance case: every
node’s claim is a sentence, and you supply the code that decides whether that sentence is true.
This tutorial assumes the Runner is installed and that you have the release model from jPipe 101.
Two files: the model and its checks
A justification and its verification live in two files:
- the model (
release.jd): what you claim and how it is argued; - a step library (a
.pyfile): how each claim is checked.
The runner matches them up by element id, runs the checks bottom-up (evidence → strategy → conclusion), and reports PASS/FAIL for every node.
Step 1: Compile the model to the runner’s input format
The runner does not read .jd directly; it consumes a compiled JSON. This JSON is jPipe’s
interchange format: the compiler emits it, the runner reads it, and other tools can produce or
consume it too, so the language front-end stays decoupled from whatever executes or analyses the
argument. Keep these generated artefacts apart from your model by exporting into a run/ folder:
$ mkdir run
$ jpipe process -i release.jd -m release -f JSON -o run/release.jd.json
Step 2: Scaffold the step library
You could write the Python by hand, but the compiler can generate a skeleton for you: one function per element, already wired with the right decorators:
$ jpipe process -i release.jd -m release -f PYTHON -o run/release_lib.py
That produces stubs like this (bodies left as pass for you to fill in):
# run/release_lib.py
from typing import Any, Callable

from jpipe_runner.framework.decorators.jpipe_decorator import jpipe
from jpipe_runner.framework.decorators.link_decorator import jpipe_link

JpipeProduce = Callable[[str, Any], None]


@jpipe_link("release:e1")
@jpipe(produce=[])
def the_test_suite_passes(produce: JpipeProduce) -> bool:
    """[evidence] The test suite passes"""
    pass
The produce: JpipeProduce parameter is the callback the runner injects for publishing results;
its type alias, Callable[[str, Any], None], simply says “call it with a variable name and a value”.
Two decorators do the work:
@jpipe_link("release:e1")ties this function to the element whose id isrelease:e1, the model name followed by the element’s id (<model>:<id>).@jpipe(consume=[...], produce=[...])declares the function’s data-flow contract: which variables it reads and which it writes.
The data-flow contract
That second decorator is the heart of the runner. It declares, for each function, which named
variables it reads (consume) and which it writes (produce), and those names are how facts
travel up the argument:
- A piece of evidence runs a check and produces one or more variables carrying its result. Evidence sits at the bottom of the argument, so it only produces; it consumes nothing.
- A strategy consumes the variables produced beneath it, the facts it reasons over, and
decides whether they add up. It can itself
producea variable for the node above it.
The order in which nodes run is fixed by the argument itself: the runner topologically sorts the
support graph from the compiled JSON, so a piece of evidence always runs before the strategy it
supports, which runs before the conclusion. The consume/produce names are what move data along
that structure: when a node produces a variable and a node above it consumes that same name, the
runner hands the value from producer to consumer at the point the consumer runs.
Structure and data flow must agree, and the runner enforces it: every piece of evidence must
produce at least one variable, and every variable a strategy consumes must be produced by a node
that runs before it. Get it wrong and the runner refuses to execute, which is exactly what the dry run
in Step 4 catches.
Step 3: Implement the checks
Now fill in the bodies. Each evidence performs a real check and publishes its result with produce;
the strategy combines the results it consumes. To keep the example runnable, we stand in for the
real signals with mock evidence in a mock/ folder: a mock/tests.ok marker for the test suite,
and a mock/CHANGELOG.md that must mention version 2.0. In a real project these checks would call
your test runner or inspect the repository instead.
# run/release_lib.py
import os
from typing import Any, Callable

from jpipe_runner.framework.decorators.jpipe_decorator import jpipe
from jpipe_runner.framework.decorators.link_decorator import jpipe_link

JpipeProduce = Callable[[str, Any], None]


@jpipe_link("release:e1")
@jpipe(produce=["tests_pass"])
def the_test_suite_passes(produce: JpipeProduce) -> bool:
    """[evidence] The test suite passes"""
    result = os.path.isfile("mock/tests.ok")   # your real check goes here
    produce("tests_pass", result)
    return result


@jpipe_link("release:e2")
@jpipe(produce=["changelog_ok"])
def the_changelog_is_up_to_date(produce: JpipeProduce) -> bool:
    """[evidence] The changelog is up to date"""
    with open("mock/CHANGELOG.md") as f:
        result = "2.0" in f.read()   # the changelog names this release
    produce("changelog_ok", result)
    return result


@jpipe_link("release:s")
@jpipe(consume=["tests_pass", "changelog_ok"])
def all_release_gates_pass(tests_pass: bool, changelog_ok: bool) -> bool:
    """[strategy] All release gates pass"""
    return tests_pass and changelog_ok
Each function returns a boolean (did this node hold?), evidence calls produce(name, value) to
publish a variable, and the strategy receives those variables as arguments named exactly as it
consumes them.
You may have noticed the scaffold also generated a stub for the conclusion release:c, yet there is
none here. A conclusion asserts nothing of its own: it is the very claim the strategy beneath it
establishes, so the runner never executes a conclusion, even if you bind a function to it, and simply
marks it from that strategy’s result. Leave it unimplemented, and delete its stub to keep the library
tidy.
A sub-conclusion is the one claim you can run: left unbound it is derived just like a conclusion, but bind a function to it and the runner will execute that function and let its boolean stand as the sub-conclusion’s verdict, a handy place to add an extra check partway up the argument.
Step 4: Validate without running (dry run)
Before executing anything, check that the model and the library fit together: every evidence produces, every strategy’s inputs are satisfied:
$ jpipe-runner --dry-run -l run/release_lib.py run/release.jd.json
If a piece of evidence forgets to produce, the runner tells you precisely which one and how to fix
it, a good reason to dry-run in CI.
Step 5: Run it
$ jpipe-runner -l run/release_lib.py -f svg -o run run/release.jd.json
The runner executes each check and prints a report:
jPipe Files.Justification :: release
==============================================================================
evidence<release:e1> :: The test suite passes                         | PASS |
evidence<release:e2> :: The changelog is up to date                   | PASS |
strategy<release:s> :: All release gates pass                         | PASS |
conclusion<release:c> :: Version 2.0 is ready to ship                 | PASS |
------------------------------------------------------------------------------
1 justification, 4 passed, 0 failed, 0 skipped
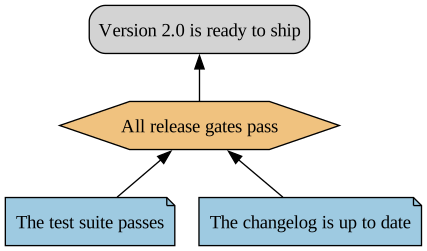
It also writes a diagram, coloured by the outcome: your justification, verified:
When a check fails
Now change one of the mocks so its check no longer holds. Edit mock/CHANGELOG.md so it stops naming
version 2.0 (say it still tops out at 1.9), and run again:
$ echo "## 1.9" > mock/CHANGELOG.md
$ jpipe-runner -l run/release_lib.py -f svg -o run run/release.jd.json
release:e2 now returns False, because the changelog never mentions 2.0. The runner reports it as
FAIL, and because its result never reaches the strategy, everything above it is skipped rather
than reported as holding:
jPipe Files.Justification :: release
==============================================================================
evidence<release:e1> :: The test suite passes                         | PASS |
evidence<release:e2> :: The changelog is up to date                   | FAIL |
strategy<release:s> :: All release gates pass                         | SKIP |
conclusion<release:c> :: Version 2.0 is ready to ship                 | SKIP |
------------------------------------------------------------------------------
1 justification, 1 passed, 1 failed, 2 skipped
The diagram makes the break obvious: the failed evidence turns red, while the strategy and conclusion that rested on it are greyed out as skipped. You see at a glance both what failed and how far the damage spread.
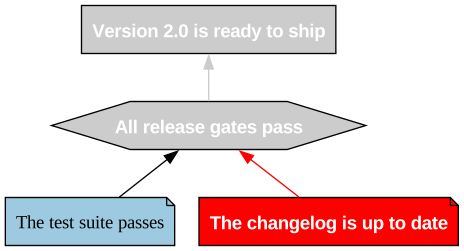
Skipping the nodes above, rather than failing them, keeps the report honest: jPipe never claims “the release is ready” held when the evidence beneath it never ran.
Where to next?
- Run it in CI/CD: have every pull request checked automatically and the diagram posted back as a comment.
For a complete, end-to-end worked example, see the Bellairs CSE demonstration.